6.27.2010

cilantro lime rice


this rice has been sitting in the back of my mind, waiting for the perfect use, ever since i saw it a couple weeks ago. i know, i know, it's a replica of the rice used at some chain burrito restaurants. but i don't really care about that. let's be honest; cilantro and lime juice in a spicy burrito sounds like the perfect contrast.

it wasn't until this week when i was finally able to try it out as filling for vegetarian burritos (more on that later). it was a breeze to put together - make some rice, mix in some cilantrol & lime juice, eat. the recipe is really just a guideline for how much cilantro and lime juice should be added so feel free to play around with it and add more or less to your liking.

cilantro lime rice
get the recipe at annie's eats

6.25.2010

pico de gallo


easiest side dish ever.

great in tacos. or on a chip.

even better on top of a soft boiled egg.

that's all i have to say about it.

pico de gallo
adapted from martha stewart
10 minutes prep, makes ~2 1/2 cups

4 roma tomatoes, deseeded, and chopped
1/2 small onion, chopped
~1/4 cup chopped cilantro
juice of one lime
~1 teaspoon kosher salt
for more spice, add 1 seeded, diced jalapeno

mix well. let sit about an hour before serving to let the flavors meld.

6.23.2010

banana bars


whenever i have an extra banana lying around, i put it in the freezer for baking. sounds like a good plan, right, since it always seems like whenever i actually want a brown, mushy banana, i don't have any on hand.

except that right now, i have six - yes, six - bananas in my freezer. which is better than the nine i had last week.

when i overheard someone ask "where's those banana bars?" when we were camping last week, i tucked away the thought of aunt judy's banana bars and made a mental post it note to go through my recipes and make it when i got home.

only i couldn't find it.

anywhere.

not in my binder with all the others passed via email or hand written note.

not stuck in a cookbook as a bookmark.

not stuck in a pile with recipes i pulled out of magazines.

no where. i don't have it.

after sulking for a good five minutes, i went through every cookbook i have. not a single one had a recipe for banana bars. i hadn't realized what an exotic food they are. strike two.

strike three. i did a quick search on some of my favorite food blogs. nope. nada. nothing. doesn't anyone else eat these things?!?

i turned to my last resort: google. almost strike four. i wanted something that replicated aunt judy's recipe. no nuts. no sour cream. no butter. especially no shortening.

i had just about given up, until one last final thought crossed my mind: good old betty crocker. and she pulled through.


and let me tell you, they're as close to aunt judy's as i remember them to be.

banana bars with cream cheese frosting
adapted from betty crocker
10 min prep, 30 min cook time, makes 24 bars

1 cup mashed bananas (it was three for me)
1 cup sugar
1/3 cup vegetable oil
2 eggs
1 cup all purpose flour
1 teaspoon baking powder
1/2 teaspoon baking soda
1 teaspoon cinnamon

pinch of salt
  1. heat oven to 350 and grease a 9" x 13" pan.
  2. in a large bowl, mash the bananas and mix in the sugar, oil, and eggs.
  3. stir in the flour, baking powder, baking soda, cinnamon, and salt.
  4. pour into the pan and bake, uncovered, about 25 minutes, or until a toothpick comes out clean.
  5. while the bars are cooking/cooling, make the frosting.

3 ounces cream cheese
1/4 cup butter
splash of vanilla
3 cups powdered sugar

  1. if the cream cheese and butter aren't soft (straight out of the refrigerator), microwave a few seconds at a time until soft.
  2. mix in the vanilla. mix in the powdered sugar, half a cup at a time, until the desired consistency.
  3. spread on the bars when cool.
2012.04.09 this was bluebonnets & brownies' pick for the secret recipe club!
2015.02.01 this was my hobbie lobbie's pick for the secret recipe club!

6.21.2010

pork with pineapple salsa (and garden update)

before i get to today's dinner, i have tomatoes!

after last year's tomato fiasco (something, i suspect deer, ate my tomato plants down to nothing) it looks like i'm going to have some this year!


and leeks. this year's carrots look way better than last year's.


as long as i can keep the rabbits away, i'll have romaine in a couple weeks too.


i've also got peas, green beans, mesclun mix, potatoes, red onions, green onions, zucchini, and pumpkin working along nicely.

anyway, back to the pork.

i haven't been able to get a good red onion at the store for weeks. they're all mushy, dented, or have rotten spots in them. i don't know what the deal is, but it isn't good none the less. while this definitely would have been better with a red onion (and looked better in the photo), my vidalia worked fine.

here's a trick for those of you who don't want to fire up the grill, don't have a grill pan, or don't want to substitute a saute pan. use a george foreman grill. everyone i knew in college had one, so i'm sure many of you have one lying around too. i have an older model of this one, that's perfectly sized (big enough to cook 4 burgers at a time on it). my onion ended up in six slices, which i cooked first for four minutes. took it off and added the pineapple for four. took those off and cooked the pork for three, and cut up the onion and pineapple while the pork was cooking. it worked perfectly and was faster than heating up a saute pan.

and i bet this would be perfect with grilled apples and onions instead of pineapple. peel and slice the apple into rings, grill, and cut into bite size pieces, just like the pineapple.


pork chops with pineapple salsa
adapted from cooking light, march 2010
30 minutes start to finish (includes breaking down the pineapple), serves 2

4 thin cut pork chops
1/4 pineapple, cut into 1/2" thick rings
1 small red onion (or white onion if you can't find red), sliced into 1/2" thick rings
the juice of one lime
salt & pepper
non stick spray
  1. in a bowl, add ~1 tablespoon of lime juice and the pork. let marinate while you cut up the pineapple and onions. don't worry about coring the pineapple slices when you cut them. it's much easier to remove them once they're cooked.
  2. heat a grill pan over medium high heat (or see my foreman grill method above). grill the onion and pineapple about 4 minutes per side. remove from heat and when cool enough to handle, cut into bite size pieces. and place in a bowl. add the remaining lime juice and toss with the onion and pineapple.
  3. cook the pork about 3 minutes per side.
  4. serve pork with pineapple onion salsa.

6.20.2010

food always tastes better outside

growing up, we spent a lot of time camping in the adirondacks. fish creek. rollins pond. golden beach. long lake. blue mountain. old forge. eighth lake. it's funny how i can picture every place in my head, yet if i had to tell you where they are on a map, i couldn't do it.

as a kid, i knew that you saw eighth lake out the right side of the car before you got to it. i knew water safari was on the main drag in old forge and that the adirondack museum is in blue mountain lake. but no idea what route the main drag is or what direction blue mountain lake is from eighth lake.

so last weekend we spent a long weekend camping at fish creek.


we drove up to lake placid and spent an afternoon walking around mirror lake soaking in the sunshine and lunch at the cottage.


on the way back to the campground, we took a couple detours. there were flowers...


and views of the olympic ski jump and bobsled tracks, and the mountains, of course.


and then there's the food.

steaks the size of my head.


last night's salt potatoes turned into this morning's breakfast potatoes.


sausages and pancakes to fuel a day of reading, canoeing, scrounging for fire wood, and catching up with family.


does everyone eat like this when they're camping!?

i don't know about you, but something magical happens to food when it's cooked and eaten outside. especially over an open fire. and it's best when served on a stick, and after a beer or two.


and now, after driving home via route 28, i realized how close everything is to each other.

and most importantly, the view of eighth lake is exactly how i remember it.

6.19.2010

strawberry jam


i'm a jam snob. i've never ever, not even once, bought a jar of jam or jelly in my entire life. in fact, the only time i've ever eaten non-homemade ham is when i go to a diner and they serve those small, single serve packets with the peel off tops (which half the time are impossible to open). and let's be honest, those aren't even close to the same level as homemade.

i come from a long line of jammers. ever since i can remember, my grandpa makes a few batches of strawberry jam each summer when his berries are ripe. (a month or two later, my mom follows with raspberry jam made from berries she's picked off the side of the road somewhere, growing wild.) i've always had a steady supply of jam so i've never had a reason to make it myself. lame reason? yes, but true.


so this year when grandpa asked me if i wanted to come down and learn how to make jam, i decided it's about time i finally learn for myself and took him up on his offer. and what did i learn?

making jam is easy!

it just takes a lot of fruit, a lot of sugar, some heat and clean jars. that's it. all in all it took us about 45 minutes to make a batch. heck, it takes me longer to make dinner some nights. and now i've got a years' worth of jam!


but i did get some insider tips -
  1. grandpa sticks with the recipe on the sure jell fruit pectin insert. and adds a small, maybe half teaspoon of butter, to keep the berry/sugar mixture from foaming while boiling.
  2. cut the berries into quarters and mash them with a potato masher. measure the mixture. if you don't have 5 cups, add enough water to make up the difference.
  3. you can control how chunky or smooth you want your jam. when the berries are cooking, leave them mashed for chunky jam or use an immersion (stick) blender (or a regular blender, it will work fine, it just makes a mess) to smooth it out. i made one batch pretty chunky and another smoother.
  4. when boiling your lids and rings, put the lids inside the rings in the pot. then you don't have to try to lift flat tops out of the bottom of the pan (which is nearly impossible, without a magnet).
now that it seems so easy, what kind of jam should i make? any suggestions?

homemade strawberry jam
get the recipe from Sure Jell

6.17.2010

garlic pasta


after a nice long weekend of camping in the adirondacks (more on that later), i really wanted a bowl of pasta. which is good, since i don't have any meat, vegetables, or dairy in the house and wasn't in the mood to stop at the store on the way home from work.

sometimes, i can't wait to get home and cook. i mean, really cook. cook a two hour dinner on a tuesday night. and those nights, i don't care so much about eating. it isn't about eating dinner. it's about making dinner. other nights, the last thing on earth i want to do is cook. when making toast seems like a chore. i can't be the only one that has those days, can i? and then there are the other evenings, where i want to cook mostly because i want to eat. i don't care so much what it is that i am cooking, as long as i can eat. it has to be quick. with minimal prep and dishes to do. and it has to be tasty.

last night was a quick and tasty kind of night. after being away for a couple days, i didn't mind cooking, but i was exhausted, and starving. all in all, this pasta took me a whole 20 minutes to throw together. i dirtied two pans, a knife, and a cutting board. not too bad.

one word of warning: do not eat this pasta if you plan to talk to or kiss (especially kiss) another person within 24 hours, unless said person has also eaten this pasta. the star is definitely garlic . garlic infused butter, to be exact. since we both love garlic so, i used a full six large cloves. four seems like a more reasonable amount, but feel free to add more or use less as you wish.

kate's garlic pasta
20 minutes start to finish, two generous servings

1/2 pound pasta, any type of long strand (ie. papardelle, fettucini, spaghetti, etc)
4 garlic gloves, peeled and smashed with your knife
3 tablespoons unsalted butter
1/4 cup fresh grated parmesan cheese
salt & pepper
  1. put the pasta water on to boil.
  2. in a saute pan, melt the butter over medium low heat. add the crushed garlic cloves. watch the garlic while the pasta is cooking and turn it down if it starts to sizzle. you don't want the garlic to cook, but infuse the butter with flavor.
  3. drain the pasta when it's done cooking and remove the garlic from the butter using a slotted spoon. you can save the crushed garlic for tomorrow's dinner or toss it.
  4. toss the pasta with the butter and parmesan cheese. season with salt & pepper and enjoy your garlic breath.

6.14.2010

asian flair turkey burgers


"when you're writing this up, do you give me any credit for grilling? or do you just skip over that part and talk about how good the food tastes!?"

that was the response i got after my teriyaki chicken kebabs went live last week. this week, here's my homage to jason and his grilling mastery.

he starts with lump charcoal (we skip the briquettes because of the binders holding it together. i don't know exactly what it's made of, but jason likes the lump better anyway). and puts a ball of newspaper in the bottom of the chimney. the top is filled with charcoal and the newspaper is lit. ten minutes later he's got hot charcoal without lighter fluid! and he's ready for my burgers.

this time turkey.

and surprisingly, not my idea.


it's way too early in the summer for me to be almost sick of burgers. but i am. i must eat about three times as much beef in the summer than i do in the winter. the addition of garlic, onion, soy sauce, and sesame oil was just different enough and yet still the same. perfect.

one word of warning - i let my onions and garlic go too long in my mini chopper. they were completely liquid with no chunks. sure, they incorporated well, but my burgers were soggy and really hard to put on the grill. luckily they didn't fall through the grill grates but it was a definite possibility.


asian flair turkey burgers
adapted from savorybites
30 minutes start to finish, serves 4

2 cloves garlic, chopped
1 small onion, chopped
1 tablespoon sesame oil
1 tablespoon soy sauce
1 pound ground turkey
1 egg
4 slices provolone or cheddar cheese (use american in a pinch)
4 rolls or buns
  1. in a small food chopper or food processor, chop the garlic, onion, sesame oil, and soy sauce until it's very fine. if you don't have a food processor, chop the garlic and onion into very small pieces and mix in the sesame oil and soy sauce.
  2. add the onion mixture to the turkey. add the egg. use your hands and mix until thoroughly combined.
  3. grill about 5 minutes per side. serve with mayo and ketchup.

6.12.2010

chicken & vegetable kebabs


there's something about grilled meat. and grilled onions. and grilled mushrooms. i could eat them every day in the summer.

this recipe is so unbelievably easy, i don't know if i can really call it a recipe. marinate chicken in some vinaigrette for an hour. toss whatever vegetables you want to add to the skewers in the same vinaigrette. skewer and grill. easy as pie.

mix it up. change up the vinaigrette to whatever you like (use a favorite store bought version). add vegetables you like. i would avoid is zucchini and summer squash, simply because it becomes very soft and is likely to fall off the skewer while grilling.

don't care for meat or prefer a meatless meal? skip the chicken altogether and add some portabello mushrooms. they grill perfectly.


chicken & vegetable kebabs

marinade adapted from the joy of cooking
1 1/2 hours start to finish, three hearty servings

for the marinade:
3 garlic cloves, minced
1/4 cup red wine vinegar
3/4 cup olive oil
~1/4 cup chives, or any other fresh herb you have handy
salt & pepper

for the kebabs:
1 pound chicken breasts or tenders, cut into bite size pieces
12 ounces mushrooms, cut in half
1 vidalia onion, quartered and wedges separated
2 green peppers, quartered and cut into pieces
  1. make the marinade by combining the garlic and vinegar in a very large bowl (you're going to toss the vegetables in it later). slowly add the olive oil, whisking continuously to ensure it's incorporated. mix in the chives or other herbs you're using.
  2. add the chicken to a zip top bag. pour half the marinade over it. seal the bag closed and make sure all the chicken pieces are coated. marinade for about 30 minutes.
  3. while the chicken is marinating, prep the vegetables bu cleaning and cutting them to size.
  4. prep the grill right before you skewer the kebabs.
  5. when the chicken is done marinating, toss the vegetables with the remaining (unused) half of the marinade.
  6. skewer the chicken and vegetables and grill about 5 minutes on each side, until the chicken is cooked. for the ultimate summer meal, serve with a side of salt potatoes.

6.10.2010

peanut butter blondies


sometimes, at the end of the day, i want to trade in dinner for a fresh, homemade cookie.

i wish my story ended with a dinner of cookies. (don't tell me you've never done it before.) sadly, it ended with a grilled chicken salad. don't get me wrong, the salad was good, chicken perfectly grilled, but it was the cookie i really wanted.

so while i was supposed to be inside making a salad while jason mowed the lawn, i was half making a salad and half making these bars.

i don't know why i don't make blondies more often. honestly, this may be the very first time i made them. i was expecting a peanut butter cookie with chocolate chips in bar form. and i was ever so slightly disappointing.

"not enough peanut butter."

that was the first thing i said with my mouth half full of hot blondie. yes, they definitely taste like peanut butter. maybe my hopes were too high. and honestly, i almost always have the same criticism for peanut butter cookies. i've yet to meet one that had enough peanut butter.

peanut butter blondies
get the recipe at handle the heat

6.08.2010

mint ice cream


when we moved in to our house last spring i was really excited to see the huge patches of spearmint and peppermint in our yard. as the summer went on, the mint grew and grew and grew and i couldn't think of anything good to make with it - except mojitos. i'm not a fan of mint tea, so that was out. and a year ago, i was still in wedding mode, so spending a friday evening steeping mint leaves in hot milk wasn't high on my list of priorities.

so this spring, when the mint started taking over again, i couldn't wait for it to be hot enough to make one of my favorite ice creams: mint chip. and i knew i wanted to make it from scratch - no mint extract here.


i found a couple different recipes that all used the same technique - steep the leaves in hot milk & sugar for about an hour before adding the egg yolks, cooking, and eventually churning in the ice cream maker. the technique seemed simple enough. it was the chocolate and the mint i was afraid of.

see, i don't like big chunks of chocolate in my ice cream. chocolate chips - of any size - were out. i didn't want to spend the time to shave a bar of chocolate and the flecks would actually be too small for my liking. i'm really glad i stumbled on david lebovitz's chocolate method. it was genius: perfectly simple and the perfect amount of chocolate.

now on to the mint. which do i use? peppermint or spearmint or both? i found recipes of all types online - some recommended spearmint only, others recommended peppermint and to avoid spearmint, and a third set didn't say one way or the other. i decided this time to try spearmint with a plan to make a peppermint batch later in the summer for comparison sake.


before (L) and after (R) steeping the mint for an hour

now that i had my mint picked out and chocolate technique down, i needed a recipe. i liked his chocolate technique so much and everyone in the blogosphere raves about his ice cream, so i gave david lebovitz's a spin. perfection.


my steeped milk was a natural light green

the big difference between homemade mint ice cream and store bought is obviously the flavor. store bought mint is so strong and sweet. homemade mint is definitely minty, but it's got a nice herbal flavor to it too. and not too sweet. surprisingly, i like it better than the stuff from the store.


mint chocolate ice cream
find the recipe from david lebovitz

6.07.2010

electric lemonade


about this time last summer, after walking and biking i don't know how many miles of the erie canal, we finally took a boat down it.

it wasn't anything too exciting; just a nice way to kill a lazy, hot summer afternoon. although the canal was trying real hard to be the star of the show, it just couldn't get out of the shadow of the lemonade.

it was blue. it was lemon. and it was strong. two of these and you're definitely not doing anything but laying in a hammock for the rest of the afternoon. we all had a round, sailed down the canal, and finished our afternoon with beer and grilled meat outside. the lemonade whisked out of memory.

flash forward a couple weeks to jason's birthday. we were making plans, deciding what food to make for the party, when out of nowhere, he decided he didn't want anything to drink but a recreation of the lemonade. so this is not my drink. it's not my creation. it's totally his. so last july while i was desperately trying to make a mojito from the mint in our backyard, jason was whipping up these electric lemonades like it was his job.

you should have seen his eyes light up last friday when i suggested - and then made - them for us.

jason's electric lemonade
makes one

handful of ice
~1 shot vodka
~1 shot blue curacao
lemonade powder mix
lemonade

add a handful of ice to a tall glass. add the blue curacao and vodka. add a small amount (~1/2 teaspoon) lemonade powder mix and top off with lemonade. enjoy your glass of summer sunshine!

6.05.2010

black bean tacos


meatless dinners can be surprisingly difficult. mostly because i tend to default to the same things: pasta and eggs.

it's time for something new. time to kick it up a notch. time for beans.

whenever i have a choice, i always pick black beans over pinto beans. they seem to have a heartier taste and texture. pinto beans always seem to fall apart and turn into mush, where black beans keep their shape. so black beans it is.

choosing black beans was the easy part. what to do with them? regular tacos seemed plain. i wanted something different. black beans, rice, and cheese sauce sounded perfect.

and it was.

there are a couple things i might do different next time. swap flour tortillas for the corn ones used. corn tortillas always fall apart when you try to roll and pick them up to eat, so they aren't the best choice for tacos. i bet a hearty spoonful of chunky salsa or homemade guacamole would be perfect on to top them off. that's the one thing they're missing - a little brightness. the beans, rice, and cheese are so heavy, a dash of raw vegetables would be great on top.

black bean tacos
adapted from kitchen sojourn
40 minutes start to finish, 4 average servings

1 cup uncooked white rice
1 medium sized onion, chopped
3 cloves garlic, minced
2 14.5 ounce cans black beans, rinsed
1/2 cup water
1 teaspoon cumin
1 cup half n half
4 ounces monterey jack cheese, shredded or cut into small pieces
12 ounces cheddar cheese, shredded or cut into small pieces
salt & pepper
olive oil
corn tortillas
  1. cook the rice according to your package directions (add rice and 2 cups water to a pan. bring to a boil, cover, reduce heat and simmer about 20 minutes).
  2. heat a saute pan over medium heat and add about a teaspoon of olive oil. saute the onion and garlic until translucent, about 5 minutes.
  3. add the beans and 1/2 cup water to the onion & garlic and cook about 10 minutes. season with salt & pepper and add the cumin. reduce heat to low and simmer, stirring occasionally, until the cheese sauce and rice are done.
  4. heat a saucepan over medium heat and add the half & half. when it's warm, add the cheese a bit at a time, making sure it's melted and the cheese or half & half aren't burning.
  5. warm the tortillas in the microwave. layer the rice, beans, and cheese sauce in the tortilla and serve.

6.03.2010

teriyaki chicken kebobs

finally! dust off your grills and stock up on charcoal. it's finally time to fire up the grill!

not that we haven't been for the last couple weeks. it's just that the weather in may is so fickle. the one thing you can count on is that the good weather won't last and you can't really plan for anything. which stinks if you want to grill after work. especially if you want to marinate something in the morning and grill it that night.

but june. june is different. the first half of june is all rain. rain in the middle of the night. rain in the middle of the day. while i love it for my garden, i hate it for keeping me held hostage inside.

last week we had a break from the rain. and i took full advantage of it.

i was already sick of burgers on the grill. and hot dogs aren't worth all the fuss. i love grilled onions, and since jason loves anything and everything asian, these teriyaki chicken kebabs fit the bill perfectly.


i mixed up the marinade and cut up the chicken into bite sized pieces the night before i planned to grill them and let the chicken marinate for about 20 hours. i know, i know, most cookbooks suggest three to six hours. but really, who is home in the middle of the day during the week to put their chicken in the marinade? not me. and it was perfectly fine after almost a day.

and really i only made a few slight changes to the recipe. i didn't have any open white wine, so i substituted water. easy exchange. like the original poster, i also keep a good sized piece of peeled ginger in my freezer. ginger is cheap, but i always forget to buy it when i need it. this way i always have it. but instead of thinly slicing it, i grate it with my fine microplane (the zester). works perfectly every time. i also didn't pour the marinade over the chicken (or baste it) as the kebabs were grilling. i avoid basting cooked food with liquid that had raw meat in it. it freaks me out (and probably doesn't help that on the next food network star last season someone, i don't remember who, got in big trouble because they suggested basting meat with a marinade).

see those perfectly caramelized chicken pieces and sweet onion slices? i may have put them together, but it was jason who pulled it off by cooking them perfectly. i gotta give credit where it's due.

i can't wait to use the marinade on grilled chicken breasts. or as a stir fry sauce.

teriyaki chicken kebobs

find the original recipe at Sortachef
30 minutes active time, serves two

for the teriyaki marinade:
1/4 cup soy sauce
1/2 cup water
3 tablespoons brown sugar
1 teaspoon white vinegar
2 teaspoons minced or grated ginger
2 cloves garlic, minced

for the kebabs:
~1 pound chicken breasts or chicken tenders, cut into bite sized pieces
1 medium sized yellow onion (i bet red would be good too)
  1. at least three hours and up to 24 hours before you plan to grill, make the teriyaki marinade by combining all ingredients. place the marinade in a zip top bag and place the chicken inside. seal the bag and make sure the chicken is evenly distributed and each piece is in the marinade. refrigerate until you're ready to grill.
  2. on grill day, heat your grill to medium high.
  3. slice the onion into relatively large slices. skewer the chicken and onion (be sure to soak wooden skewers in water for about an hour ahead of time so they don't catch on fire on the grill).
  4. grill about 7 minutes, flip and grill an additional 7 or until the chicken is cooked all the way through.

6.02.2010

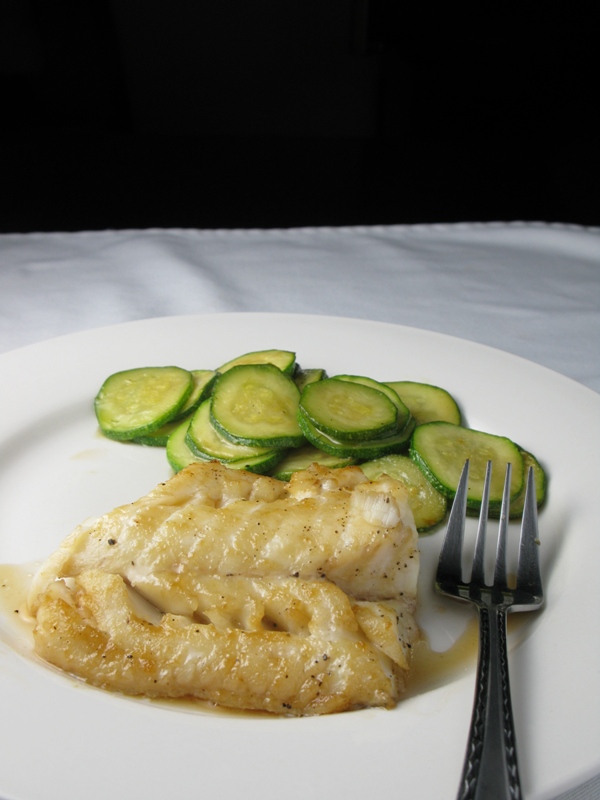
soy glazed cod with zucchini


i can't believe i paid $1.75 for 2 zucchinis. correction: i can't believe i paid for zucchini.

last summer i made the critical i-just-bought-a-house-and-i'm-super-excited-to-have-a-garden mistake and planted six - yes, six - zucchini plants. and for about three months i was picking zucchinis every day, sometimes five at a time. until finally, there was a frost. and i gave up and declared zucchini season over (by stomping on the plants). all in all, i picked about 200 of those suckers. i had so many i couldn't give them away. my coworkers knew not to buy zucchinis because in the next day or two, i'd bring in another pile.

so jason was a little shocked when he asked me what his list was when we went to the grocery store. he didn't say a word when i asked him for two zucchinis - and the only response when he came back with them - "can you imagine if we got $1 for every zucchini we grew last summer?! we'd be rich!!!"

i should have passed on them. don't get me wrong, sauteed zucchini is a perfectly good side. it's just that those from the store aren't ever as good as the ones grown in your own yard. but since i just planted my zucchini plants on monday, i settled with the store.

but enough about the zucchini, the fish is the star of this dish. light and flaky, perfectly cooked in 7 minutes, and with a sweet glaze, it was the perfect dinner for an evening that finally felt like summer!

soy glazed cod with sauteed zucchini
adapted from real simple, june 2010
20 minutes start to finish, 2 generous servings

2 tablespoons brown sugar
1 tablespoon soy sauce
2 teaspoons grated ginger (i used my microplane)
2 six ounce fillets cod or other white fish
2 small zucchinis, thinly sliced
canola oil
salt, pepper, crushed red pepper
  1. heat broiler (set oven to 500F). line a baking sheet with aluminum foil.
  2. combine the brown sugar, soy sauce, and ginger in a bowl and set aside.
  3. heat a saute pan over medium heat. add ~1 teaspoon canola oil and the zucchinis. saute for about 10 minutes, or until softened. season with salt, pepper, and a little crushed red pepper flakes.
  4. while the zucchini is sauteing, place the fish on the foil lined sheet. drizzle with canola oil.
  5. broil the fish for about 5 minutes. spread about half of the glaze over the fish. broil another minute, add the remainder of the glaze, and broil one more minute (for a total of 7). check to ensure fish is done - it should be opaque and flaky.
  6. serve the fish with a side of zucchini.
Related Posts Plugin for WordPress, Blogger...